
In the first part of training the STM32 with LL functions we talked about processor and microcontroller and mentioned the differences of them. In addition, we said that the ARM company is just the processor designer and we investigated three important types of microcontrollers precisely. At the end the ST microcontroller which is one of the users of ARM processor was introduced.
If you remember ST company has two 8-bit and 32-bit microcontroller which the 32-bit type is our goal. We intent to discuss about 8-bit and 32-bit type and how to start with 32-bit type microcontroller.
8-bit or 32-bit?
When you follow this tutorial, probably you are familiar to what is bit. When we say a processor is n-bit, it means that the registers of this processor are n-bit. Maybe you ask what is a register?
A register consists of putting several bits together, so when it comes to a 32-bit ARM processor it means that inside the processor there are 32-bit registers. Let us start with a related concept. There is another concept which name is Flag and can be consist of one or some bits. Actually, Flag refers to the bits that indicate a specific status, so it is not usual to call every bit a Flag, although a Flag itself is nothing but a bit. As an example, if the fourth and fifth bits of register A has logical value 1 it means that the UART peripheral is processing the previous data, so it is not possible to send new data to this peripheral or if the seventh bit of register B has 0 logical value it means that overflow occurred.
Advantages of 8-bit or 32-bit

In the first glance, the more bits in the register, the more powerful the processor. Checking the register alone is not adequate criteria for surveying the processor but, generally we can say almost it is true that more registers contribute to the more processing. As an example, one of the advantages of more registers is the more space for addressing. In reality, the higher number of registers are full of advantages but, in some cases engineers who want to work with them in register base programming know it as disadvantage.
How to configure a microcontroller

Before using the configuration tools and programming a microcontroller we intent to describe how a microcontroller set for a specific target. Is not Setting up the microcontroller for a specific goal is just set or reset the registers? Is it piece of cake? No, it is not simple, if the number of the registers was 10 or 100 it would be simple but in the microcontroller the number of registers is more than this and each of them are located at a specific address. In addition, numerous control duties, predefined self-commands and other things are problem.
So, what is the solution? One remedy is to download the microcontroller datasheet from the company website and make an initial configuration file according to the datasheet and then setting up a peripheral. How long do you think it takes to make a LED blinker with this method?
In the most optimistic case if you have adequate C language and hardware architecture knowledge it takes many hours.
Many hours for a LED blinker! Yes it is true; it may take many hours. If you agree me that this method is not rational follow Sisoog.
One of the appropriate solutions is that companies have provided users with address and registers for specific peripherals and targets and categorized them according to standard names and given the settings in the form of macros or functions. When we generate the project all of the mentioned parameters are generated automatically along with the project, and we can use them. So now, in addition to solving the previous solution problem, we have a lot of functions and macros which help us to be faster. This solution can be used in different ways that we will describe them below.
STM32 microcontroller configuration methods
Registerà
There is no function in this configuration, and we just use the structures and names that the company provides us and just put 0 or 1 in the registers. In this method we use prepared macros and primary predefined files.
As an example, if supposed to write a value in a 32-bit register we use a macro and just put a phrase like “LL_GPIO_PIN_1” in the register, but if we want to use the first method you should put a phrase like “11110000111100001111000011110000” or HEX value in the register which we should define its address.
The above example is the minimum advantages versus first method.
LL (Low Layer) functionà
In this method we do not manipulate the registers directly and just use the functions that are nominated LL functions and addresses the registers according to the entrance of the function. A peripheral start working by calling each of these functions, to fully operational of a peripheral we must use several LL functions with a specific sequence.
HAL (Hardware Abstraction Layer)à
This type of functions is in the highest level in program language and is far from the register level, practically we rarely use the registers in the HAL functions, despite this we can access to the registers without any problem through macros. When we use HAL function in addition to it sets the registers for a particular area of peripheral, in most cases reduces the setting that a user should do in LL function. As an example, if it supposed to use in LL functions five function and a bit C language to setting up a peripheral, all of this can be done with a HAL function.
SPL (Standard Peripheral Libraries)à
SPL functions are in the middle level and has a level between LL and HAL functions. Of course, these functions are no longer updated, and it is better that you do not use these functions either. It is rational that you can not understand the concept of these functions when you have not used them so to elaborate let us give an example.

Suppose that we want to send a “kamin” string through the serial port. In the LL functions after set the initial setting of serial port and enabling it, first we should send character ‘k’ from the string through serial port and wait for the acknowledge of the transmission, if the transmitting done successfully send character ‘a’ and this sequence continues to the end. But when we use the HAL functions, after done the initial settings and enabling the port, put all “kamin” string in the related function entrance and this HAL function itself does all the sequences we needed to do in the LL function with the proper timing.
HAL functions prepared most of the things and if you survey them adequately you can see that in some cases these functions correct your mistakes. Now after describing the configuration methods details precisely, it is the time that according to our promise choose a method to continue by stating the reasonable reasons.

Logically, each of these methods is suitable for a specific purpose and each method has its own advantages and disadvantages. As an example, if we want higher speed in program, HAL functions are not recommended and register method is more proper. On the other hand, if we want the highest speed in developing a project and the speed of the program is not considered, the best choice is HAL function, and the register method is not recommended at all.
But what is our aim?
It is better as far as possible work in the lowest level of programing because the goal is education. Learn the concepts and principles completely and after some experience and success, you can work in the higher level to increase the development speed. HAL function due to do all the sequences just by a call and never involve the programmer with hardware and software details is not proper for education so is not our target.
On that side, using the register method due to a lot of involvement with the registers may distract you from the concept so it is not good choice. Our choice is LL functions, and we learn how to use it.
In choosing the LL function maybe you have doubt so before ending this part of STM32 tutorials we want to address the practical test between LL and HAL functions, but since we are not yet familiar with programming tools we only provide the test results.
Have a look to the below diagram which shows the microcontroller GPIO pin speed by using the LL and HAL functions.
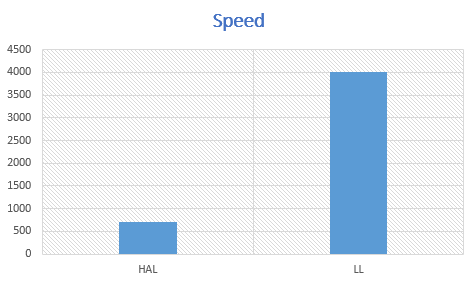
Sure, you are shocked with this result! There is lot of reason behind this high speed difference which we survey in next parts so follow Sisoog.
In the third part we learn you making a project through STM32CubeMX and a simple code through Keil code editor and the program it on the circuit practically.