
In the second article we introduced CPU structure and the program implementation. In this article we are going to teach you how to install and configure necessary tools for compiling and debugging written codes for Raspberry Pi boards. As we mentioned before, Raspberry Pi hardware in based on ARM processor, for this reason unfortunately we cannot compile codes using X86 compiler such as Visual studio. For more detail about important tools, installation and configuration method follow SISOOG.
Available compiler
To use and compile suitable code for Raspberry Pi processor we need an ARM compiler. There are not many compilers with this capability. Below there are a list of available compilers:
1: ARM Keil
2: ARM IAR
3: GCC
Which compiler do we use?
It is easy to choose about compilers, both IAR and Keil are not free and you have to buy license, we as SISOOG team prefer to recommend and use open source as well as free tools.

So, we select GCC, but not only GCC is free and open source but also is flexible and better than Keil. Maybe it is not as strong as IAR but the performance is same.
how to install GCC compiler?
Let us move on, how to install GCC compiler? It depends on your computer OS, if you are using Linux OS all you have to do is to type just one command.
|
1 |
sudo apt-get install gcc-arm-embedded |
Notice: This command is only for Debian based on Linux distribution. For Windows users go to GCC ARM Embedded and download the latest version based on your Windows OS and GCC installation version.

Installation is simple, just click next bottom like other software, the video can help you.
To make sure software installed correctly you can type this command in windows’ Command Prompt or Linux terminal.
|
1 |
arm-none-eabi-gcc -v |
For correct installation, output log is like below:
|
1 2 3 4 5 6 7 8 9 10 11 12 13 14 15 16 17 18 19 20 21 22 23 24 25 26 27 28 29 30 |
Using built-in specs. COLLECT_GCC=arm-none-eabi-gcc COLLECT_LTO_WRAPPER=c:/program\ files\ (x86)/gnu\ tools\ arm\ embedded/4.9\ 2015 q1/bin/../lib/gcc/arm-none-eabi/4.9.3/lto-wrapper.exe Target: arm-none-eabi Configured with: /home/build/work/GCC-4-9-build/src/gcc/configure --build=i686-l inux-gnu --host=i686-w64-mingw32 --target=arm-none-eabi --prefix=/home/build/wor k/GCC-4-9-build/install-mingw --libexecdir=/home/build/work/GCC-4-9-build/instal l-mingw/lib --infodir=/home/build/work/GCC-4-9-build/install-mingw/share/doc/gcc -arm-none-eabi/info --mandir=/home/build/work/GCC-4-9-build/install-mingw/share/ doc/gcc-arm-none-eabi/man --htmldir=/home/build/work/GCC-4-9-build/install-mingw /share/doc/gcc-arm-none-eabi/html --pdfdir=/home/build/work/GCC-4-9-build/instal l-mingw/share/doc/gcc-arm-none-eabi/pdf --enable-languages=c,c++ --disable-decim al-float --disable-libffi --disable-libgomp --disable-libmudflap --disable-libqu admath --disable-libssp --disable-libstdcxx-pch --disable-nls --disable-shared - -disable-threads --disable-tls --with-gnu-as --with-gnu-ld --with-headers=yes -- with-newlib --with-python-dir=share/gcc-arm-none-eabi --with-sysroot=/home/build /work/GCC-4-9-build/install-mingw/arm-none-eabi --with-libiconv-prefix=/home/bui ld/work/GCC-4-9-build/build-mingw/host-libs/usr --with-gmp=/home/build/work/GCC- 4-9-build/build-mingw/host-libs/usr --with-mpfr=/home/build/work/GCC-4-9-build/b uild-mingw/host-libs/usr --with-mpc=/home/build/work/GCC-4-9-build/build-mingw/h ost-libs/usr --with-isl=/home/build/work/GCC-4-9-build/build-mingw/host-libs/usr --with-cloog=/home/build/work/GCC-4-9-build/build-mingw/host-libs/usr --with-li belf=/home/build/work/GCC-4-9-build/build-mingw/host-libs/usr --with-host-libstd cxx='-static-libgcc -Wl,-Bstatic,-lstdc++,-Bdynamic -lm' --with-pkgversion='GNU Tools for ARM Embedded Processors' --with-multilib-list=armv6-m,armv7-m,armv7e-m ,cortex-m7,armv7-r Thread model: single gcc version 4.9.3 20150303 (release) [ARM/embedded-4_9-branch revision 221220] ( GNU Tools for ARM Embedded Processors) |
It means all configuration and installation is done correctly.
Write the first program
however it is always the hardest part, because there are lots of parameters which can cause a program not to work. This is why the first program is written as simple as possible, in computer word it is called “HELLO WORLD”. Here is the code:
|
1 2 3 |
main( ) { printf("hello, world"); } |
If you want to use this code in electronic world it is different because PRINTF needs lots of knowledge of hardware and software to be configured. So, in Raspberry Pi world we start with something totally different including a building LED which is actually a program sends 0 and 1 to a processor pin continuously. This is the simplest program that all embedded engineers write LED blinker code to check the correctness of running program and hardware.

This is the reason why the most of the header boards have at least one LED which can be controlled by the central processor’s gpio. Raspberry Pi boards also have a LED named ACT. First of all, we have to know which pin of processor is connected to this LED. Depends on various type of Raspberry Pi hardware boards, we consider Raspberry Pi 2 as default. Before all we need schematic of board which fortunately is available. For downloading the schematic go to Raspberry Pi website.
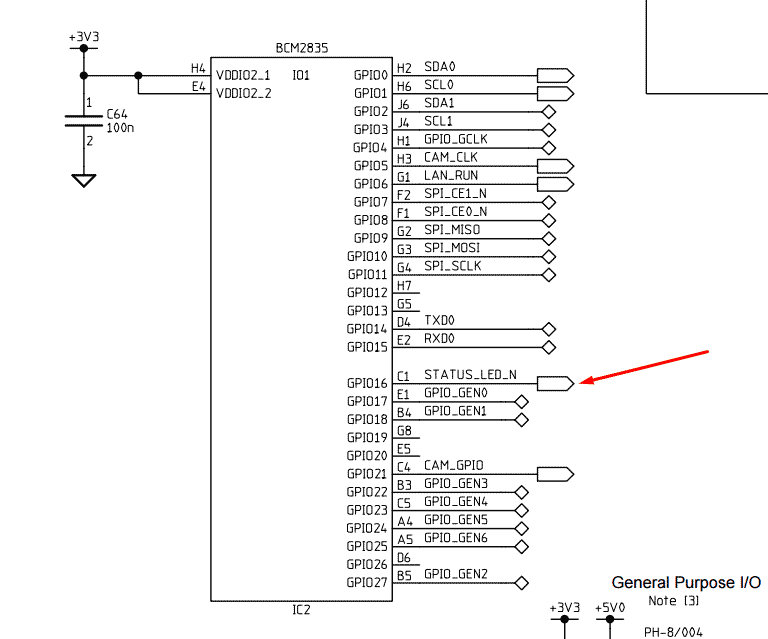
As you can see in the picture above, ACT LED which is called status LED by the schematic, is connected to GPIO16. To control the GPIO, processor’s datasheet is needed which is also available by Raspberry development team. Due to the obtained information and processor registers, it is easy to write the program, but in this article is just the sample code. In the next article we will demonstrate the way of implementation the code and details.
|
1 2 3 4 5 6 7 8 9 10 11 12 13 14 15 16 17 18 19 20 21 22 23 24 25 26 27 28 29 30 31 32 33 34 35 36 37 38 39 40 41 42 |
/* The base address of the GPIO peripheral (ARM Physical Address) */ #define GPIO_BASE 0x3F200000UL #define LED_GPFSEL GPIO_GPFSEL4 #define LED_GPFBIT 21 #define LED_GPSET GPIO_GPSET1 #define LED_GPCLR GPIO_GPCLR1 #define LED_GPIO_BIT 15 /** GPIO Register set */ volatile unsigned int* gpio; /** Simple loop variable */ volatile unsigned int tim; /** Main function - we'll never return from here */ int main(void) __attribute__((naked)); int main(void) { /* Assign the address of the GPIO peripheral (Using ARM Physical Address) */ gpio = (unsigned int*)GPIO_BASE; /* Write 1 to the GPIO16 init nibble in the Function Select 1 GPIO peripheral register to enable GPIO16 as an output */ gpio[LED_GPFSEL] |= (1 << LED_GPFBIT); /* Never exit as there is no OS to exit to! */ while(1) { for(tim = 0; tim < 500000; tim++) ; /* Set the LED GPIO pin low ( Turn OK LED on for original Pi)*/ gpio[LED_GPCLR] = (1 << LED_GPIO_BIT); for(tim = 0; tim < 500000; tim++) ; /* Set the LED GPIO pin high ( Turn OK LED off for original Pi)*/ gpio[LED_GPSET] = (1 << LED_GPIO_BIT); } } |
How to compile the program?
We save the above program with the name blinkact.c . Before compiling the code, we need to customized setting for of GCC compiler which can be applied through compiler line options. All we need is to run the bottom line at terminal or command line.
|
1 |
arm-none-eabi-gcc -O0 -mfpu=neon-vfpv4 -mfloat-abi=hard -march=armv7-a -mtune=cortex-a7 -nostartfiles -g blinkact.c -o kernel.elf |
To elaborate every part of command we describe them in detail.
mtune=cortex-a7 tells the compiler to compile the code for Cortex-A7 family.
march=armv7-a defines the architecture. After running the above command, the program is compiled and kernek.elf is created as output. Elf file contains lots of information about used liberies, some parameters for faulting and also executive details. To extract executive codes, we need to run this command:
|
1 |
arm-none-eabi-objcopy kernel.elf -O binary kernel.img |
After this kernel.img is created as executive file. Now the program is ready to run.
In the next article we are going to discussed about used tools and how to configure Eclipse editor.